Tuesday, October 7, 2014

20mm WWII Canadian Infantry from AB Miniatures - The Battle for Ortona, 1943 (Part II)


This post is a continuation of one from a few weeks ago where I showed my first efforts depicting Canadian infantry during their 1943 assault on Ortona, Italy.

As with the original group, this squad is made up of ten 20mm figures from AB Miniatures, which can now be sourced through Eureka Miniatures

The Bren team along with the section leader who is armed with a Sten. Interestingly, from what I've gathered, the Canadians seemed to have loathed the Sten and usually swapped them out for Thompsons whenever they had the chance.

I can't recommend this range enough. I would, without hesitation, put them up against the best that 28mm has to offer. They have such wonderful, natural poses and their physiques are slim, almost gaunt, which from looking at contemporary photographs, seems to fit the period very well.

A rare colour print of a Canadian soldier in Med. summer uniform. Wonderfully lean and scruffy. They changed back to their heavier wool gear during December's Moro River campaign which culminated in the Battle for Ortona. 

The current marketplace for WWII gaming seems more or less dominated by either 15mm or 28mm miniatures. I find this interesting as it was only about ten or so years ago that 20mm figures were regarded as the uncontested scale-of-choice in this period. Frankly, to my way of thinking, the dominance of 20mm made perfect sense for wargaming (and still does) as there is an bewildering number of inexpensive plastic kits, die cast toys and railway stuff in 1:76 / 1:72  / 1:87 scale.


A case in point is this 'knocked out' Hetzer that I've included with this group of figures. This is an old 1:72 scale Esci kit (cheap as borscht) which I assembled and painted over an evening about 15 years ago. While a bit long in the tooth, I think it's aged relatively well (like it's owner ;)) and fits in perfectly with 20mm figures.


To me, 20mm is the ideal accommodation between the detail of 28mm and the sense of ground scale that 15mm affords. Don't get me wrong, I like every one of these scales and I collect WWII in all of them, including 6mm (yes, I'm a bit touched), but I have to say that I have a soft spot for 20mm. It gives the painter something large enough to work with, provides a nice sense of scale on the tabletop and it allows a gamer to amass a sizeable collection of miniatures and terrain without having to sell an organ to acquire and store the stuff.

The charming Italian building in the background is by Frederick C, a fellow Conscript from the Fawcett Ave gang.
In a week or so I'll post the last section from this platoon, along with it's HQ and some supports.

Next Up: Gladiators or Pulp Adventurers - not sure which yet...

Wednesday, October 1, 2014

Post-Apocalyptic Tube Raiders inspired by Metro 2033


Wanting to switch gears for a bit I thought I'd add a few more models to my slowly growing collection of post-apocalyptic figures inspired by Glukhovsky's novel 'Metro 2033'


In his book, a bio-nuclear war occurs in 2013 which devastates most of the world. In Moscow, the only survivors are those who managed to make it into the Metro (notable for being one of the deepest in the world). 

Twenty years later the survivors have splintered into various conflicting socio-political factions (neo-soviets, neo-fascists, cannibals, etc.), each centered around a Moscow metro station. In addition to this ever-restless friction between rival factions is the fact that horrific mutants from the surface are trying to force their way into the metro. So basically, at its core, it's your typical Russian novel, y'know, all sunshine and lollipops.


These castings are from the Lead Adventure Miniatures' 'Zone Dogs' pack. I really like this whole range of figures as they are so varied and jam-packed full of characterful details. 


I especially like the figures which sport a mixture of civilian and military gear as it lets me play around with whacky colours and patterns that you'd never see in a purely military setting.


For the basework I followed pretty much in-step my other stuff and kept with an ash waste motif, with  a smattering of shattered bricks for colour, and a dash of rusted piping as a final flourish. I hear this is all the rage in 'Irradiated Homes and Gardens'.


I'm pleased with how the bright orange foam sleeping pad turned out on this fellow. The original colour was pretty darn bright but it toned down nicely with a bit of thinned ink.


For this chap I gave him a well-worn Russian NBC (Nuclear, Biological and Chemical) suit. I was really wanting to give him a lurid GAP branded satchel but I didn't know if Russia has a big-brand clothing store equivalent.


I have another package of these guys tucked away somewhere, but I'm thinking I need to build up a horde of some sort of atomic-mutant-type-thingys to act as counterpoint to these 'uncorrupted' survivors. I have a few ideas rattling around in my head, but more on that later.


Next Up: Hmm, I dunno. It will either be more WWII Canadians or perhaps Gladiators... Squirrel!!

Wednesday, September 24, 2014

20mm WWII Canadian Infantry from AB Miniatures - The Battle for Ortona, 1943 (Part I)


About a year ago I was rummaging around my storage shed and came across a collection of 20mm WWII figures that I had originally painted-up for use with Arty Conliffe's Crossfire (a very fine and innovative set of rules btw). This group of figures primarily composed of old, but quite good SHQ, Britannia and FAA models. This discovery began me thinking of how I could make use of these figures for future gaming. I decided that I could conscript my 15mm Flames of War collection (a set of rules I'm not especially fond of) for use with Crossfire and then I could use these venerable 20mm figures for skirmish gaming (Chain of CommandBolt Action, etc). As I sorted through the lot I discovered that  I had scads of German Fallshirmjaegers (from a previous Crete scenario), but I needed some more Commonwealth figures to serve as opponents. 

So, I began snooping around the web and came across Anthony Barton's (of AB Miniatures) superb 20mm WWII range. So credit card was duly unsheathed and an order placed. Nonetheless, as these things frequently go, by the time the figures arrived I had abstractedly wandered off to another project (I know, how typical) so the castings were studiously unpacked, briefly admired and then stored away awaiting further inspiration.

Canadian armour moving through Ortona by Charles Comfort
The spark came a few weeks ago when I began reading about the 1943 battle of Ortona which occurred during the Italian campaign. In the larger scheme of things this battle was largely a sideshow, dwarfed by the campaigns in the Eastern Front and overshadowed by the impending landings in Normandy, but to many in Canada Ortona is regarded as our own 'little Stalingrad' due to its brutal and unrelenting house-to-house combat.

'Reinforcements Moving up in the Ortona Salient' by Lawren Philips Harris
As a brief background, Ortona is a port town situated on the Adriatic coast of Italy, relatively close to Rome along a east-west axis. In 1943, with the Allies lines of supply stretched to the extreme, Ortona was regarded as strategically important as it possessed one of the few ports which could accommodate deep-draught shipping. 


For this reason Montgomery wanted it taken and so General Christopher Vokes, commander of the Canadian 1st Infantry Division, ordered his men to batter their way into the town through a series costly frontal assaults along its approaches. Vokes wasn't necessarily a bad commander, but he really wasn't very good either. Monty regarded him as 'a plain cook' and I think that assessment is fairly accurate. So instead of bypassing the town and threatening to pocket the Fallshirmjaegers garrisoning it, Vokes decided to take Ortona by direct assault. 

Map of Ortona showing the path of the Canadian assaults.
The Germans had positioned themselves very well, establishing interlinking fields of fire for effective ambushes, and had littered the advance with mines and boobytraps. The Canadians found that attacking over the rubble-heaped streets while under enemy fire was extremely gruelling and so the casualty toll rose.  The Canadians realized that they had to develop other means in order to grind ahead or the attack would stall completely. One notable trick they came up with was the tactic of 'mouse-holing' (also used in the fighting at Stalingrad). This involved the Canadians blowing a hole through the adjoining walls between upper floors and then systematically working their way down. While this tactic was effective in keeping the men out of the fire-swept streets, the process was fraught with danger as the advance from room-to-room often involved ferocious close-quarters combat.


Over eight days, from December 20th to the 28th, the Canadians of the 2nd Brigade forced the German paratroopers out of the town, but at a cost of nearly 2400 in dead and wounded. The Moro River campaign (of which Ortona was a part) inflicted almost a quarter of all casualties suffered by the Canadians during the entire Italian campaign. After reading the accounts of the campaign one can appreciate why the term 'D-Day Dodgers' deeply rankled with the men fighting up the Italian peninsula.


I painted these figures to represent men from the Loyal Edmonton Regiment and the Saskatoon Light Infantry which were two of the four infantry battalions which were committed to the battle (the other two units were the Seaforth Highlanders and the Princess Patricia Canadian Light Infantry). 


I was struck by the photos of the incredible amount of pale/white rubble in Ortona so I tried to replicate the same in my groundwork, with lots of shattered masonry, dust and debris scattered about.


I've pretty much completed a full platoon, with various supports, but I thought I'd show them over two or three blog posts so the sculpts can stand on their own and not be lost within a mass of figures. 


These castings were a real pleasure to work on and I hope you enjoyed looking them over. 

Next: To mix things up, some Post Apocalyptic Raiders!

Sunday, September 14, 2014

1:1200 Napoleonic Naval - The Battle of Trafalgar or: 'Trafalgarage'


Sylvain here, reporting from my garage. A few years ago, I painted enough sail ships to play the battle of Trafalgar, and since I have been looking for a set of rules that could handle this huge engagement in a reasonable amount of time. "Trafalgar", by Mark Latham, is elegant yet it would take days of gaming to bring the battle to its conclusion. Another difficulty is the sheer size of the gaming surface. Even at 1:1200. Nelson's column is four feet long, making it impractical on any gaming table. 

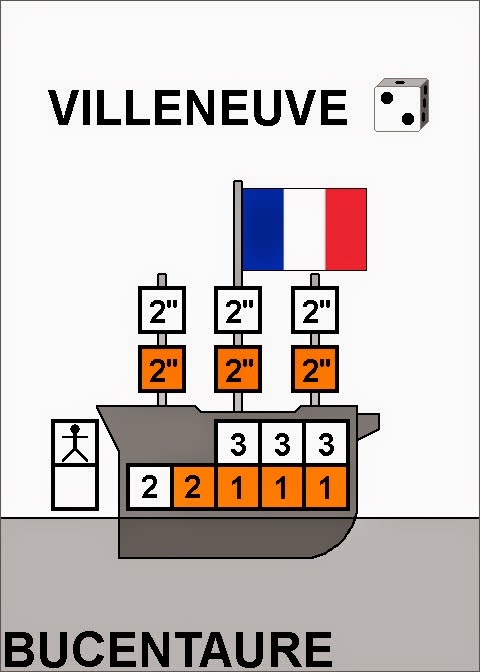
So I came up with the idea of playing the battle in my garage. I decided to regroup ships in squadrons of three and set them on a twelve inch long block. Each block has been identified with a huge sticker to facilitate recognition from a standing point of view. Movement and firing have been simplified. Ships move at twelve inches per turn, which is exactly the length of a block. Here is an example of a ship display.


Flag Officers. Some ships carry a flag officer. Each die shown beside the name represents an opportunity to re-roll any die roll during a turn. This can be applied to any unit within 12" of the flag ship.

Orange boxes. Every time one or more orange boxes are marked off during a turn, the ship must test for morale.

Masts. Each box represent one hit and the white ones must be marked off  before the orange ones. For the leading ship, each box lost reduces the speed by 2", resulting in the whole squadron loosing movement. For the other ships in the squadron, damage on masts only counts towards a morale check.

Hull. Each box represent one hit, to be marked off from left to right. The number inside each box represents the number of attack dice.

Crew. Each crew box represents one die roll to be used for boarding.

We played during our regular Friday night session. Curt and Jeremy took command of the Allies, respectively as French and Spanish, while Sean and Conn shared control of the British fleet.

The Admirals and the Referee


The Hispano-French fleet, minding its own business, heading for Cadix, just beyond the garage door, already dreaming of the pleasures of wine and love... Many times during the evening I've heard suggestions to paint the garage floor the color of the ocean.


The British fleet, ready to enter from the West wall of the garage. Even my garage was to small to fully accommodate the original disposition at Trafalgar. The next logical step will be to play in the backyard.


Two British columns converging on the French and Spanish ships. In this new iteration of the battle, both Nelson and Collingwood sail in the same super column. But wait! What is the rearguard doing?


Admiral Curt, boldly changing history, tacks his squadrons in the opposite direction, trying to lure the British fleet into pursuit while the vanguard, lead by Admiral Jeremy, would go for a quick exit.


So, if I do this it will really cock-up the game right? Excellent...

Sylvain and Admiral Conn trying to puzzle through Curt's crazy gambit.

Okay, time to pay the piper.


The vanguard is almost at the door! Three British squadrons are close behind. Many ships will be able to escape.


The final, savage, melee for the rearguard.

The game was flowing at a nice pace and four players were able to bring this huge battle to a conclusion during the course of four hours. The gaming experience was satisfactory for both sides, although I should have had established clearer victory conditions at the start. The rules, although simplified to the extreme, produced results compatible with the historical outcome. All in all, I would say the experience was a complete success.