Wednesday, December 30, 2020

Gentlemen Adventurers for the Great Siege of Malta

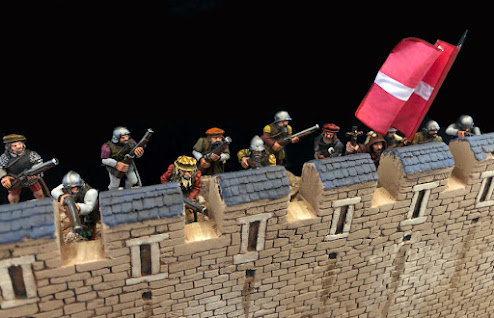
Today I'm revisiting my 1565 Siege of Malta project. I started work on this collection last year and I thought it high time to add another unit to the defenders.

These hard-bitten arquebusiers represent a group of Christian 'Gentlemen Adventurers' who played a significant role in the Great Siege. These were essentially companies of Spanish and Italian mercenaries, drawn to the Siege through the winning combination of base avarice and religious zeal. They made up a good portion of the defenders, outnumbering the well known Knights of Malta several times over. I have an impassioned priest trying to keep their bodies and souls focused on killing Ottomans for the Faith. (The barbaric actions of both the Ottomans and the Christian powers in the Middle Sea is not really a great endorsement for organised religion - but I digress.)

These figures are from Wargames Foundry's El Dorado range, sculpted by the talented Mark Copplestone (his models seems to be an unintentional theme for me these past few weeks). Like the rest of my Malta stuff, these are based up individually as I envision the games will be more skirmish based.

Nonetheless, wanting players to be able to move their groups quickly, at least at the onset of the game, I had Byron cut up some sabot bases that I had I sketched up. I designed this one to indicate skirmishers, or missile troops, spread out in a loose formation. Players can have the command stand at the front or the rear to suit their aesthetic sensibilities.

A brave and righteous man of the cloth leading from the front...

...or one with wee less conviction.


As you can see, I'm amortising the use of my Vatican Enterprises walls with a cameo appearance here.

Out of their sabot bases and manning the walls.

Next: Something from WWII

-Curt

Monday, December 28, 2020

Lily Hill - Pulp Adventuress


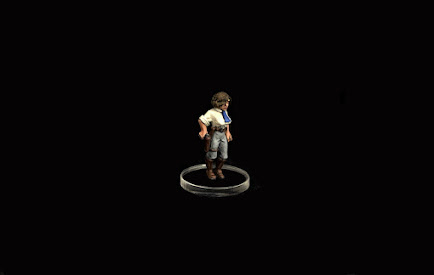
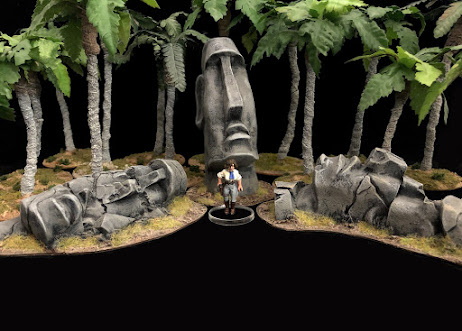
This is Lily Hill. She is a wilful dilettante, an adventuress, a raider of tombs, and a breaker of hearts.

Lily is a daughter of an oil magnate who desperately wanted a son to take over the family business. Wanting to be accepted by her father, Lily became a tomboy as a young girl, learning to shoot, ride, drive, fly and use very, very uncouth language. Nonetheless, she has grown into a beautiful young woman and has discovered she can use her feminine wiles as yet another tool in her ever growing set of of skills.


Lily has developed a deep fascination of ancient cultures, and so has undertaken several expeditions into uncharted jungles and mapless deserts, looking for artefacts and treasures of lost civilizations. 

These adventures often get Lily into tight scrapes, but she is more than up to the task of getting out of them (or making them even worse).

'Nazis... I hate these guys.'

Before I take on the 'Hall of Traps' I'm going to take a detour and make an addition to one of my many standing projects. Hopefully more on that soon.

-Curt


Saturday, December 26, 2020

Four Cops and P.I. 'Ginger' Brede From Arkham City


A few years ago Sarah and I took in the Partizan show up in Newark. We met up with several Challengers including SidneyR, DaveD, MartinC and Tamsin. During our visit, Tamsin kindly gifted me a pack of Copplestone 'Beat Cops' for my pulp adventure collection. 

I've had these primed and sitting in my paint queue for several years. Yes, I hang my head with the shame of it. Before Covid we had a game where I really wanted some police figures and so I swore I'd get them done-up this Challenge.

Accordingly, here are several boys from Detachment B, Arkham City Police. I love Copplestone's models - just enough detail for character, but nothing overblown - they almost paint themselves.


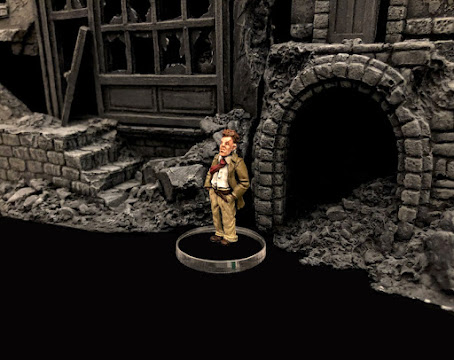
I thought these cops needed an associate, so I painted up a private dick from Artizan Miniatures. I've named him Atticus Brede. The locals call him 'Ginger' due to his red hair. Ginger Brede was formally a sergeant in the Arkham City Police, but had a nervous breakdown after a midnight call to Miskatonic University saw him the only survivor from his detachment. Due of his insane rantings from that night he was 'offered' early retirement. Nonetheless, Ginger has chosen to honour his fallen comrades and continues to investigate the strange goings happening within his beloved city as a private investigator.


I like how slovenly Ginger is, with his untucked, partially buttoned shirt, and wearing too-large trousers, cinched up by a belt. Lots of character.


Thank you so much Tamsin, they were great fun to work on!

Curt

Thursday, December 24, 2020

Deep One Rising


I've decided to be crafty and enter the Chambers of Challenge via the Aquifer.

I could think of no better way to infiltrate this cold, watery portal than by using a creature accustomed to its inky depths, a beast not easily unsettled by unknown horrors, in fact a creature that is probably more frightening than most things it will encounter.


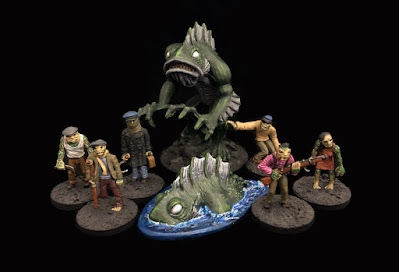
Behold!! Something rises from the deep! The water breaks and we see the Herald of Father Dagon, the Protector of Mother Hydra, the Great Deep One of Y'ha-nthlei !


This is a fun resin piece from the Strange Aeons range over at Uncle Mike's Miniatures. It's the companion to the full sized model which I did a few Challenges ago. These are such great figures with loads of character.


Just for a sense of scale, here's a shot of them with their Innsmouth relations. Yeah, not really a bunch of lookers, but they are very loyal, just not fond of strangers. 


Thanks for dropping in folks!


Wednesday, December 23, 2020

A Classic Pig-Faced Orc


This is my first entry to this year's Painting Challenge. As a nod to our dungeon theme, here is an 'Orc with Guisarme' (Orc1) from the venerable 1979 Minifig range, I believe sculpted by David Hutchins.

Yes, he's a real old school classic. This figure was originally from a group of twelve that I had ordered with our first set of D&D books and dice, directly from TSR out of Lake Geneva. 

When I finally received the figures I was so impatient to have them painted that I used my dad's nasty automotive paints (no primer!) and 'brushed' it on using some of my mom's sewing needles. Yes, very primitive, but you can't fault the pure enthusiasm of youth.

Here is the last remaining orc of that cohort. As you can see, almost all the paint has flaked off over the years. It took several hours of rummaging through containers of random bits to find the original hexagonal shield. I did snoopy's dance of joy when I found it.

A certain charm. The archivist in me was torn whether to paint this guy or just leave him be.  

As historical background, the original concept of pig-faced orcs is usually attributed to Dave Sutherland, who was one of the main illustrators for TSR in the mid to late 70s. His work on the cover of 'Swords & Spells' (1976) is probably the first imagining of the face de cochon orc.

That same year The Brothers Hildebrandt also produced a painting of the capture of Merry and Pippin by orcs. Who influenced who, I'm not sure, but the idea took hold for those formative years.


TSR continued the porcine depiction of orcs in their 1977  Basic Set and the 1st Edition of the AD&D Monster Manual (I can't look at this book without getting misty, recalling a younger me pondering the weighty questions of which monster had the nastiest stats, the best art, the most treasure, etc.)

Orcs in the AD&D Monster Manual

...and from the D&D Basic Set


While the style of orcs have changed over time, certainly with the dominance of Games Workshop and Peter Jackson's movies, good ole pig-faced Orcs are still 'canon' for nostalgic old school D&D geeks like me. I love 'em. Oink.

I decided to repaint this guy in a fairly natty armoured hauberk, with bronze for his helmet, shield edge and boot banding. 


In a nod to Games Workshop I went with classic orky green for this skin tone, though now I wish I had gone with a dark flesh instead. Maybe I'll try that with the next ones I do. 


Fans of these types of orcs will be happy to find that Otherworld Miniatures has an entire range of re-imagined snouted Orcs available. I hope to have a few of these done later this winter.

Curt


Friday, November 20, 2020

The Eleventh Annual Analogue Hobbies Painting Challenge Begins in One Month!

Let's get old school.

Hey, it's November 20th.  Here in the Canadian prairies that means that the snow is in the air, the frost is on the trees and this hobbyist is ready to take solace in the warm indoors, his hobby desk and some good company. 

Welcome to the Analogue Hobbies Painting Challenge!

For our 11th edition of the Challenge we'll be adventuring through the dark vaults and dim passageways of... 'The Chambers of Challenge'. <cue ominous organ music>

For more information, head over to the Challenge Blog.

Curt Actual Out.


Monday, November 16, 2020

Hobby Studio Build: Part II - The Patio Doors Are In!

The hobby studio moves forward, slowly but surely. We've had a few delays with the closing in of our hobby studio, but this should be expected in these strange times. That being said, our sliding patio doors finally arrived (yah!) and we had them installed just before the snow flew last week.

The sliding doors are 9 x 7 (w x h), so will provide a nice source of natural light for the interior while allowing us to step out onto the patio during the warmer months. They are triple paned (and so are as heavy as sin), which will help with the heating and cooling.


Next is the main garage door. As I mentioned previously, the garage door is a bit of a conceit as the space will probably never see a vehicle in it, but it will help for resale value down the road. Right now the opening is covered with plywood sheeting - not the most elegant solution, but it keeps the elements out.

The building inspection can't be done until the space is fully enclosed, so I'm sort of at an impasse until the garage door arrives. Of course it was a special order (nothing can be simple with us), so I'm not expecting to see it until mid December. Sigh. As they say, good things come to those who wait... I'll post an update when we've had some significant progress.

Thanks for dropping in folks - Have a great week!


Up Next: An Annual Announcement!


Monday, November 9, 2020

From The Prairies to the Trenches: Saskatchewan and the First World War

Me mugging at one of our video installations at the Saskatchewan Legislature, 2014.
 

Hi All,

Since Remembrance Day is just around the corner, I thought I'd shamelessly plug the video series my team at the Provincial Archives of Saskatchewan did a few years ago commemorating our province's involvement in the First World War.

We began the series in 2014, and released a video for each commemorative year of the war. The project started out quite modestly, but over time it gained more notice and increased popularity. By the closing segments we were filling local theatres and had formed a partnership with the Canadian Broadcasting Corporation (CBC) and Radio Canada to provide the entire series in French and to further increase its promotion and distribution.

Anyway, if you have a little time over the next few days I invite you to view the series. Also, if you enjoyed them please consider clicking the 'like' button and subscribing to our channel - it would mean a lot to us at the Archive. I'm very proud of the work that we did on this series as I think it provides a unique perspective to our province's involvement during those tumultuous years of 1914-1918.


...and I was kindly reminded of an interview I did to help promote both the series and the Archives.


Saskatchewan Remembers


Monday, November 2, 2020

The Dreaded Ambull and the Zoat 'Archivist' for Blackstone Fortress

Here are two of the larger denizens of Blackstone Fortress, the dreaded Ambull and the Zoat 'Archivist'.


The Ambull is a bit ridiculous, but its lots of fun to play against in the game. The game's designers made it very hard-hitting and nigh on indestructible, which made our players very twitchy whenever one showed up on the board. 


The Zoat is a very cool figure. I like all the whacky cyber technology that's been grafted onto him, and who doesn't appreciate weapons that are called the 'Atomic Disassembler' and 'The Eradicator Glove'. Geez, I can't tell you how many work meetings I've been in where I wish I had these available.

I also appreciate that his nom de guerre is 'The Archivist' - I know, how very chilling...


Blackstone Fortress has been a blast, but I think it's time to switch gears. Not sure what yet, but something different.

I hope you all have a terrific week!

Curt


Monday, October 19, 2020

Hobby Studio Build: Part I

Hi All!

Back in June I had mentioned that I was planning to build a hobby studio on our property. Now that things have progressed apace, I thought I'd make an effort to chart it's construction through the blog as I've always had a vicarious thrill watching others with their game-room projects.

As a bit of background, our house, while great in many respects, is somewhat lacking in not having enough space for a dedicated hobby area (yeah, I know, first world problems). This is further underscored with me often hosting our gaming group's weekly gatherings, which involves using our dining room table, with a 5 x 8 blue foam 'WarBoard' as a topper. This is something I really enjoy doing, and the arrangement has been adequate over the years, but it's always been somewhat cramped and requires a bit of work to set-up and tear-down each time, especially for the bigger games.

We had considered finding another house which could better accommodate our needs, but, to be honest, we're just too picky. We really like our neighbourhood and the overall design of our existing home so it was next to impossible to find an alternative that was in our budget. So what we did instead was start exploring the idea of building a detached structure on our property that could serve as a hobby studio and additional storage. This way it would add value to our property, being it could also be used as a garage, and, better yet, would allow us to stay in place without the unknowns of a new home, a new neighbourhood and the pains of a move.

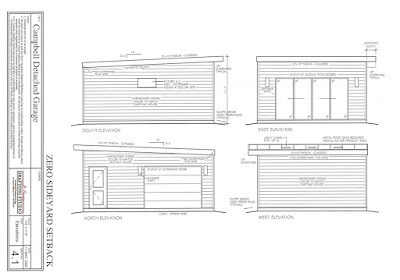
With this in mind I pulled out my measuring tape, paced-out the yard and started sketching a few ideas of what a studio might possibly look like. After I had an idea of what was possible, I secured a designer to provide  a set of professional drawings.


The plans have gone through a few revisions, but the core elements remain the same. It has a low pitched roofline so as to better blend with the look of our home, which is mid-century modern in design. The footprint of the studio is roughly 20x20, which should allow for a good sized gaming surface while still having enough space for storage. I also went with a bit higher wall height (9') to allow for taller shelving and, again, eke out a bit more storage. 

Once we had a set of plans to work from then the next step was to remove the two existing sheds that were on the proposed building site and source the trades for the work.  Thankfully, the sheds were quite well constructed and in good shape, so finding buyers didn't turn out to be too much of an issue.

The pre-existing sheds before removal.

Next step was to demolish the existing concrete pad and the bordering fence. 

The side yard, now clear of the sheds, is ready for the demolition. 

There was a several month gap where I waited for approval from the city to proceed with construction. This actually worked out well as it gave me extra time to line up the contractors (concrete, construction, electrical and roofing) and to ponder how we'd finish the structure (windows, cladding, etc.).

Once I received the green light from the city I had my concrete guys demo the site, make insulated and reinforced forms and then complete the concrete pour. I also had to get the power and telephone people in to temporarily take down some lines for our work, but it all went off without a hitch.

The bobcat skidsteer making short work of the old concrete and fence...

Note, we put in an in-ground power socket near the center of the floor so we wouldn't be tripping over cords for laptops or projectors while gaming.


The two black pipes on the right edge are for a possible future sink.

Scoring the concrete pad on its axis to reduce chances of later cracking.

Once the pad had set-up for 48 hours, we were ready to erect the prefabricated panels and roof joists for the base structure. This was a 3.5 man job (I was the .5). 

It's just like LEGO! The prefabricated parts arrive onsite.

Parts just trimmed off the sprue...


Finally the roof joists go up and the the electricians begin their work inside.


This space will (hopefully) house sliding patio doors leading out to the courtyard.


Access door to the studio.

Not shown here is the metal roof we had installed a few days after the main build. Now we're just waiting for the sliding patio glass doors and the main garage door and the structure will be sealed up. With COVID, the supply chain has many delays so we have to be patient. I hope to have an update showing their installation in the next few weeks. After that I'll schedule the building inspection and then start planning for the insulation and the interior. Wish me luck.

Have a great week everyone!

Curt, out.