Monday, February 2, 2015

Proof of Concept - 3mm ACW Regiments at 1:1 Scale


(Note: This is a cross-post from the Challenge blog.)

Alright everyone, this post exhibits a certain amount of nostalgic obsession and nerdy madness so please bear with me.

Ever since I was a kid I’ve been fascinated by miniatures and their relative scale. I have great memories of packing my Airfix plastics out into the garden and placing them at distances relative to their size (or the best I could determine, as math has never been my strong suit). So when the British were deployed amongst the peas and potatoes, and the Germans settled in amongst the corn and cabbage, they all somehow related to one another and therefore seemed more real to me. 

Anyway, when I started getting into historical wargaming in my teens I understood the need to abstract scales in order to fit scenarios onto tabletops, but I still held a desire to see these historical formations in their true form, at distances that reflected how the men of the various periods gathered, moved and fought.

Don Troiani's work seems to capture what it must have been like to live within the chaos of black powder battles...

These 3mm (1:600 scale) ACW figures (yes, they are very, very tiny) are from Pico Armor. I picked these up a few years ago in a fit of madness knowing I could finally indulge my fascination with 1:1 scale formations. I started working on a few bases, but soon became distracted by other projects (I know, how typical). Nonetheless, I found them tucked away in a drawer the other week, so pulled them out, the spark took light once again and so here we are.

What you see here is two American Civil War Confederate regiments. The one regiment on the left is made up of close to 500 figures while the other is about 340. These numbers align roughly to the historical strengths of average, campaign-strength ACW formations.


Each regiment is made up of 10 bases, with each base being a complete infantry company at 1:1 scale.


Below is a great educational photo. You can clearly see the incredible length of a mid-sized regiment drawn up into line (with another regiment in the distance). When I see this I’m immediately struck by what must have been a huge challenge of command-and-control for officer to exert their will over such a strung-out formation. I look at this and understand that having a good cadre of experienced NCO’s and junior officers was an absolute necessity for having any kind of battlefield effectiveness. 

Both regiments drawn up in line.
When you see the same regiments drawn up in open and closed columns it illustrates why so many generals (certainly in the Napoleonic period) liked to keep their soldiers in more compact formations as it enabled them to be better controlled and also it had a morale effect as they typically gained confidence by the closeness of their comrades. 

Column of divisions, two companies wide at full intervals.

Close column, two companies wide. Highly inefficient for combat but much easier to control.

Column, one company wide and at full intervals for ease of maneuver.
The 3mm farmhouse is from Pico as well. I’ve placed it on a pill-shaped base and made a snake-rail fence out of cut card ('Nells' the workhorse is in the paddock). 


Painting in such a tiny scale required me to rethink how I approached the whole process. The sculpting detail is surprisingly clear so it would be easy to go down the rabbit hole and attempt to paint these figures as individual models. But that way madness lies. Instead you have to think of these strips of figures merely as components of a mass and not get drawn into details that nobody will ever see. So with this in mind I primed them black, drybrushed them light grey, thin coat of brown wash, popped in three blobs of flesh for their faces and hands, brown for the musket stocks, bright silver for the bayonets and then put in some varied colours for blanket-rolls and hats. That’s it. Done. 

My first base. I has the Regimental Colours as part of a company (which is incorrect).

To me, the trick to doing microscale figures often comes down to the basing. It has to be minimalist enough for the figures to be clearly identified, but not so stark as to leave them looking simply like little nubs on strips. These come in strips of eight figures, so I mounted them in two ranks, but situated them off center on the base so players have a better sense to place facing the same direction (more on this in a moment). Then I used a smooth gel medium to build-up the base roughly to the edge of their bases so they are better masked. Once the gel medium cures I then drybrushed them shades of light brown and then use a green semi-opaque emulsion to infer grass. The only basing material I’ve used with these is a few traces of clump foliage to mimic bush and brush.


When I first started basing these I quickly realized that players needed some sort of visual queue to which way the units were supposed to be facing. So with this in mind I decided to design a special base for the colour party. As you see here it’s shaped roughly like an arrow with a rectangular tab at the rear in order to place unit identification (thanks to Martin at Warbases for manufacturing these for me). As an experiment I’ve tarted up one of these bases with a small piece of L-shaped plasticard and rare earth magnets so nameplates can be easily ‘clicked’ into place but otherwise be stored separately.

The Colour Party with arrowhead front and rear tab.
Magnetized rear 'L' tab.
I’ll be up-front right now in saying that this project is largely just a silly aesthetic and intellectual proof-of-concept, but who knows, if I get enough stuff accumulated I may try using something like ‘Black Powder’ to do a clash of brigade-sized forces in 1:1. Otherwise I think I may use four of these bases along with a colour party base to serve as a regiment in ‘normal sized’ games like Longstreet’. 


I have an artillery battery that I’m currently working on but more on that later. I’m not really sure if I’ll expand on this collection that much as what I’m really keen to do is Napoleonics in this scale. I have a suspicion that massed cavalry formations would look amazing done at 1:1 scale…


Thanks very much for sticking with me through this overly long post!

Tuesday, January 27, 2015

28mm Russian Civil War Sailors, Commissar & Austin-Putilov-Kregesse Armoured Car


(Please excuse the cross-post from the Challenge blog)

In 1963 the Soviet Union released the film ‘Optimistic Tragedy’.  It won ‘Best Revolutionary Epic’ at Cannes that year (though one wonders how many other films were in the running) and within the Soviet Union it took in 46 million tickets at the theatres (again, ticket ‘sales’ may have been encouraged by the state or perhaps even made free). Politics aside, it was regarded as an important film and was credited for its technical authenticity and production quality.

'Optimistic Tragedy' - Yes, only the Russians could come up with such a title for a movie...

The movie tells the story of a Russian Naval unit which comes under the leadership of a female commissar (named simply ‘The Commissar’) played by Margarita Volodina. The film centers around the struggle for the control (and identity) of a band of anarchist sailors during the Russian Civil War. This group of sailors basically has acted as a self-governing detachment until a female commissar is detached from Party headquarters to bring them under the wing of the Red Army. 

Russian Sailor Beefcake
The plot will remind many of today’s viewers of the movies in which a steely-willed teacher slowly civilizes a classroom of unruly teenagers. It's a historically interesting film, and so inspired by it, I thought it a great opportunity to put together a small vignette depicting a female commissar who is urging forward her unit of Russian sailors for the glory of the Revolution.


Historically the Russian navy provided some of the highest quality cadres for the Bolshevik cause. They were often committed to hardest fighting in both the Revolution and the Civil War – they were depended upon for their professionalism, aggressiveness and steadiness under fire.

A.Z. Zhelezniakov, a Russian sailor who became a prominent Bolshevik commander during the Civil War.
Ironically the sailors themselves became some the last casualties of the Russian Civil War.  In 1921, when based back with the Fleet at Kronstadt, they made demands for the return to the original purpose of the Revolution, namely free elections, free speech and free right of assembly. They were swiftly labeled as counter-revolutionaries and were attacked by approximately 60,000 Bolsheviks, who stormed them over the ice at Kronstadt harbor. After fierce fighting, where they caused appalling casualties amongst the attacking Red Army, the sailors either surrendered or escaped into exile in Finland. Overall, it was an embarrassing closing chapter for the Bolshevik's revolution.

The sailors seen here are all from Copplestone Castings. Wonderful models with very little cleanup required - a real joy to paint. I’ve done them up in a mix of either their regular blue or white(ish) dress trousers.  I did this to add some variation as many of the poses are virtually identical so I reasoned that some men could have resorted to their dress trousers when they wore-out their blues.


The female Commissar is also from Copplestone. On the same base I’ve added a NCO from Footsore Miniatures (previously Musketeer). I had them both based, primed and ready to paint when I realized he had epaulettes on his shoulders and an Imperial rosette on his cap. This is a BIG no-no with the Bolsheviks, especially after December 1917 where they made it mandatory to remove all symbols of imperial rank. In fact it was regarded as a damning insult to be called a ‘Golden Epaulette’ in the Red Army. Anyway, knife and file were duly brandished and the offending insignia was removed so he could be a proper 'Soldier of Equal Rights'.


As with the squad of Whites that I did a few weeks ago, I’ve placed flowers in the groundwork which aligns with their political affiliation (though with all of these fellas being festooned with red armbands and accompanied by a commissar who's waving a honkin’ huge red banner it does seem like a bit of overkill, oh well…).


The vehicle seen here is an Austin-Putilov-Kegresse halftracked armoured car. The Kegresse variant was particular to the Bolsheviks who modified twelve Austin cars to this halftrack model.  The machine gun turrets were off-set to better allow overlapping fields of fire (and just in case you're wondering, the shields on the sides of the guns were designed to protect the barrels’ water coolant casings from being holed from incoming fire).


This 1/55 scale model is from Copplestone Castings and while a bit small for my liking, was a very easy build.  Nonetheless, when I originally unpacked it I discovered that while the resin body was excellent, some of the white metal parts were flawed in that they were missing some of their edge detail, and the existing detail was rather soft.  I sent a note to Mark Copplestone outlining my concerns to which he immediately replied, apologized for the defects, insisted on sending out another model of equal value (post free), and also stated that he would pull the Putilov model until the quality issue was resolved. Wow. Now, how’s that for excellent service?! I'm very impressed and must thank Mark again for being such a gracious vendor, he’ll definitely be getting my business again soon.

Magnetics installed for the turrets.
I painted this model in a two-tone camouflage pattern which I understand was typical to the period. Photographic evidence suggests that some of these vehicles operated without any insignia or slogans so that is what I went with here (and it allows it to be used as a captured vehicle by the Whites, Poles or even for Pulp gaming).


Next up... either some Napoleonic Spanish Guerrillas or something in micro-scale...

Sunday, January 25, 2015

15mm Long Range Desert Group (LRDG) Raiders and Targets of Opportunity


Here is a LRDG raiding patrol along with some Stukas, supply dumps and fuel depots to serve as appropriate targets.


When I first saw these 15mm models released from Battlefront a few years ago I knew I wanted some to create some sort of airfield raid scenario. 

I don’t know about you but as soon as I look at a Chevy 30 cwt, festooned with all its gear, automatic weapons pointing everywhere, and packed with bearded maniacs it just screams for sh*t to blow up. 


'Yoo Halloo! Lock and load the Twin-Ks lads, we're going to partaaay!'


So, with that in mind I’ve been picking up assorted ammo dumps fuel depots, etc from Battlefront and Baueda for the raiders to mess with.  (Thanks to Nick for the tips on crate/drum colours.) I hope to make up around a dozen of these as targets as targets for the LRDG raiders.


The fabulous desert mat is from Alf over at Barrage Miniatures. It’s roughly 8x5 feet and will serve admirably for our future North Africa raiding game (and I imagine for any post apoc games). 

Alf's (from Barrage Miniatures) desert mat
...sorry for the glare on this image...
The Stukas are 1:100 scale diecast models I picked up cheap-as-couscous on eBay. I’ve dorked around a bit to dirty them up with some sand erosion and exhaust staining but otherwise they are pretty much stock. Again, they exist purely to sit on the airfield and get blown to smithereens. (I'm on the search for a 1:100 scale Ju-52 to serve as another juicy target...)


I’m thinking of either modifying ‘Formula De’ or ‘Chain of Command’ for the core rules (who knows, maybe I’ll mash them together). It will be a quasi-cooperative game where each player will command a single vehicle along with 2-3 LRDG raiders - the 'winner' being the team who amasses the most damage points, while still managing to stay alive and escape.


I need to find some sort of tents or Quonset huts for the aircrews and airfield staff. If anyone has ideas I’m all ears. I’m also working on some Afrika Korps personnel and assorted vehicles and equipment but that will be covered in a later submission.

Next up will probably be some more Russian Civil War stuff.

Sunday, January 18, 2015

1:300 Scale Renaissance Ships


A few weeks ago I saw a post on Thomas Foss’ ‘Skull & Crown’ blog where he was play-testing his draft rules and prototype models for Renaissance-period naval combat set in the Mediterranean (update: the rules are titled, 'Galleys, Guns and Glory'). I was blown away by his 1:300 scale wooden models and so contacted him to see if I could convince him to both be a sponsor to the Challenge and to let me get my grubby mits on some pre-production samples of his models. Of course, being a very gracious gentleman, he agreed to both and so I present here some samples for you to check out.

The ship models are ingeniously designed, with each ship, depending on its size, being created from 4 – 7 pieces of flat, laser-cut wood. The pieces are essentially assembled in layers, from bottom to top. While certainly not a perfect rendition of renaissance galleys they provide, in under 10 minutes assembly, a wonderful impression of those elegant vessels.

The 'Galley' and 'Fusta' models on their wood frame.
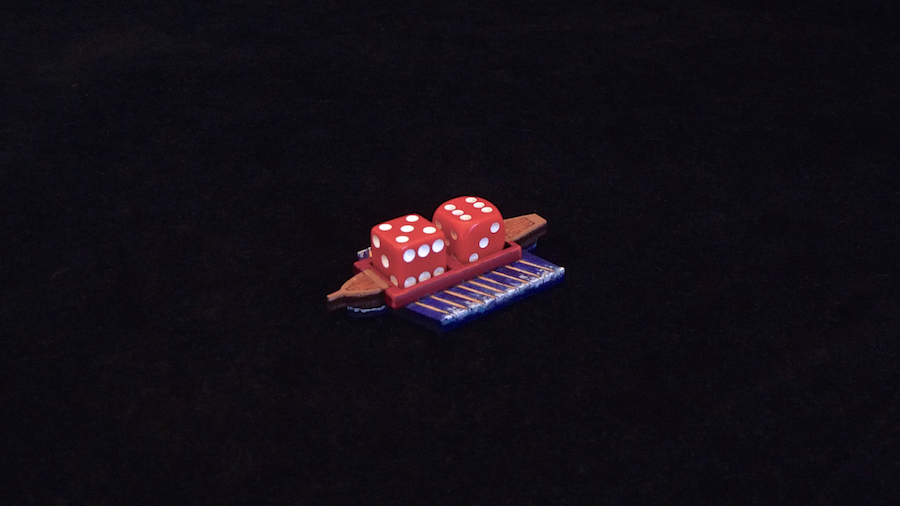
For this post I’ve assembled and painted three ships, the larger one in green and yellow is a Turkish ‘Galley’, the slightly smaller one in red is a Knights of Malta ‘Galliot’, while the little craft without the sails is called a ‘Fusta’ and serves as a small galley / dice-holder. (I don’t have a copy of the rules yet (subtle hint to Thomas) so I can’t tell you what the Fusta’s purpose is, but my hunch is that it’s used to track ship damage or perhaps morale on the larger ships. Anyway, it’s pretty darn cool.) 

A Turkish Galley
A Knights of Malta Galliot
A Fusta
Thomas was kind enough to provide me with some flags and awnings which you can see here. I understand there will also be ‘strips’ of bulwark art, but it is still in production and will be available later. With that being the case I just bodged a rough paintjob for the hulls. I have to admit that in my eagerness to get to grips on these that I forgot to properly sand the surfaces, so I apologize if the paintwork seems a bit rough.


I used .02 mm plastic rod to mock-up the rigging that seems to have worked out pretty well. At first I thought it wouldn’t be robust enough for gameplay, but now I think it may hold up alright (and imo it's much easier to work with than fiddling about with thread). 


To provide a sense of their size I’ve included a shot below of the Turkish Galley next to a 28mm SCW armoured car and corresponding figure. As you can see the Galley is quite a sizeable model. I understand that there is one class of ship that is even larger, the ‘Lanternas’, which, of course, I’m very keen to see.

The Galley next to some 28mm models
I was also provided with some round crew tokens (not shown here) but I’m thinking I might use small bases mounting 1/300 scale figures for a bit of fun.

Thomas has informed me that while the pricing has not yet been set, one can expect the ships to range in price from $10 – 25 (USD) which will also include crew markers, cannon smoke markers, a sheet of giclee printed flags, awnings and pennants (in a choice of Turkish, Venetian, Maltese, Papal States or Spanish colours) AND the larger ships will come with a ‘Fusta’ damage dice holder. With a typical force being around 3 to 6 ships it seems to me to be an affordable entry to a very characterful period. 

Thanks again to 'Skull & Crown' for these pre-production samples - they were a complete blast to work on. I wish you the very best in this new endeavour and I can assure you that you have my future business! 


Tuesday, January 13, 2015

20mm WWII Canadian Infantry at Ortona (Part III)


Several months ago I started a project to collect and paint the forces which were involved in the 1943 Battle for Ortona. To most, this battle, if known at all, is regarded as nothing but a tiny sideshow within the larger Italian campaign, but for Canada it is our ‘little Stalingrad’, the battle that brought us out from the shadow of Dieppe and re-established our reputation as a battle-winning partner of the Allied 'family'.


The struggle for Ortona was known for its vicious, grinding and intense urban combat. Fighting which the Canadians earned a hard-earned reputation for effective house-clearing during those last weeks of 1943. Their opponents were tough veteran Fallshirmjaegers from the 1st Parachute Division and as such the fighting was ferocious, often with no quarter given or received. In the end the Canadians drove the German paratroopers from the town but at a fearsome cost. Almost 1,400 men from the Canadian 1st Division (the Loyal Edmonton Regiment, Seaforth Highlanders and the Three Rivers Regiment specifically in Ortona) lost their lives during this campaign.


The models you see here are 20mm castings from AB Miniatures. These figures are, in my opinion, the best models available for this period, in this scale (and arguably most 28mm ranges as well). They are quite lanky and have a wonderful sense of animation. Many of the figures do a great job in telling a story by how they're posed. For example, I love the figure of the soldier about to throw a grenade. He is leaning back, probably meant to have his back against a wall, finger-to-pin, waiting for the signal from his section to throw his Mills bomb into an enemy-held room. There is also a figure of a rifleman on his knees firing up to an upper story. You get a sense that he has just come up from a prone position to get a quick shot before dropping back to cover again. Amazing sculpting in any scale.

This is the last section of my Canadian platoon, which also has the command team and some special weapons teams. (The other two sections, and a bit more background, can be seen here and here.)

Okay, in more detail, we have:

The Command Team, made up of the CO accompanied by his radioman, his senior sergeant waving the boys forward and a corporal charging forward with Sten SMG at the ready (the presence of the Stens are a bit anachronistic as the Canadians typically hated them and exchanged them for Thompsons at every  opportunity). The base shapes is what I use for all my skirmish gaming. Hexes for officers, squares for NCOs, rounds for troopers, octagons for special weapons, oblongs for weapon teams.


Next is an artillery Forward Observer with his radioman. Along the Moro River and in Ortona the Fallshirmjaegers specifically targeted Canadian radio operators and the brigade went through an appalling number during the month's fighting.


Here are the dogface infantry. Nothing too sexy, just the trusty SMLE rifle, loads of ammunition and a bunch of grenades. As I mentioned previously there is some brilliant animation here, specifically with the man with the grenade and the kneeling rifleman. 


Finally, here is an assortment of heavy weapon teams. 


First up a set of PIAT teams. One pair legging it and the other deployed prone for firing. The Candadians reportedly loved the PIAT and even used the weapon for 'mouseholing' during their house-to-house fighting (something that sounds suicidally dangerous to me, but I suppose when the situation demands...). 


The next duo is a 2" mortar team. From what I understand they used these to try to mask the movement of men clambering through the rubble-filled streets. 


Concluding the special weapons is this Bren gun team. I like the third man hollering back telling others from the section to bring up some more ammunition.


Another debut in this post are three MDF buildings, the designs of which I had commissioned from Byron at SG2 Creations (who, I must add, is also one of our generous prize sponsors for the Challenge). The need for region-specific buildings came about when I noticed that there were not many retailers who were providing buildings for the Italian campaign in 20mm. Byron and I poured over period photographs of the buildings at Ortona and have come up with a base ‘recipe’ to represent the narrow multi-story structures that were typical to the town. 


MDF buildings are great but one thing that they have a hard time at conveying is the wonderful bodged randomness of older architecture. We all know that any pre-20th century building is a conceit to straight walls and level floors. As such I decided to roughen up the flat, perfect face of these buildings by giving them a rough skim coat of Liquitex gel medium. Once dry, I drybrushed them in khaki and tan to give them that quasi-Mediterranean look.

While the stucco is a bit dour, Ortona was (and still is) a vibrant seaside resort town and so I thought I’d paint the shutters and doors in somewhat brighter, more festive colours. I used thinned-down ink to give them bit of a sun-bleached, care-worn look. (I have to apologize for the roofs as I haven't figured out how I want to replicate the tile. In the meantime I've just painted them a reddish terracotta so they don't look so 'MDF-ish'.)


These three buildings are separate structures so they can be swapped around, but I’m also having Byron make up some 3 and 4-unit row house sections that will have common walls but irregular roofs and facades. We’re also doing a bunch of wrecked structures (as, sadly, most of Ortona was destroyed) that will use these structures as a basic template. It should provide for a tabletop that is thematically closer to the actual location. I have a couple ideas for special one-off buildings that were notable during the campaign but I’ll post on that when things get more clear on how they're coming along.

Of course, if you're looking for an excellent and economical set of Italian Campaign buildings you now know Byron is the man to talk to. :)

Thanks for visiting folks!