Hi All!
Back in June I had mentioned that I was planning to build a hobby studio on our property. Now that things have progressed apace, I thought I'd make an effort to chart it's construction through the blog as I've always had a vicarious thrill watching others with their game-room projects.
As a bit of background, our house, while great in many respects, is somewhat lacking in not having enough space for a dedicated hobby area (yeah, I know, first world problems). This is further underscored with me often hosting our gaming group's weekly gatherings, which involves using our dining room table, with a 5 x 8 blue foam 'WarBoard' as a topper. This is something I really enjoy doing, and the arrangement has been adequate over the years, but it's always been somewhat cramped and requires a bit of work to set-up and tear-down each time, especially for the bigger games.
We had considered finding another house which could better accommodate our needs, but, to be honest, we're just too picky. We really like our neighbourhood and the overall design of our existing home so it was next to impossible to find an alternative that was in our budget. So what we did instead was start exploring the idea of building a detached structure on our property that could serve as a hobby studio and additional storage. This way it would add value to our property, being it could also be used as a garage, and, better yet, would allow us to stay in place without the unknowns of a new home, a new neighbourhood and the pains of a move.
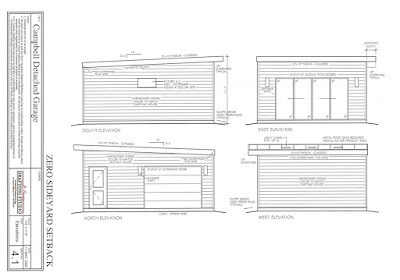
With this in mind I pulled out my measuring tape, paced-out the yard and started sketching a few ideas of what a studio might possibly look like. After I had an idea of what was possible, I secured a designer to provide a set of professional drawings.
The plans have gone through a few revisions, but the core elements remain the same. It has a low pitched roofline so as to better blend with the look of our home, which is mid-century modern in design. The footprint of the studio is roughly 20x20, which should allow for a good sized gaming surface while still having enough space for storage. I also went with a bit higher wall height (9') to allow for taller shelving and, again, eke out a bit more storage.
Once we had a set of plans to work from then the next step was to remove the two existing sheds that were on the proposed building site and source the trades for the work. Thankfully, the sheds were quite well constructed and in good shape, so finding buyers didn't turn out to be too much of an issue.
 |
The pre-existing sheds before removal.
|
Next step was to demolish the existing concrete pad and the bordering fence.
 |
The side yard, now clear of the sheds, is ready for the demolition.
|
There was a several month gap where I waited for approval from the city to proceed with construction. This actually worked out well as it gave me extra time to line up the contractors (concrete, construction, electrical and roofing) and to ponder how we'd finish the structure (windows, cladding, etc.).
Once I received the green light from the city I had my concrete guys demo the site, make insulated and reinforced forms and then complete the concrete pour. I also had to get the power and telephone people in to temporarily take down some lines for our work, but it all went off without a hitch.
 |
The bobcat skidsteer making short work of the old concrete and fence...
|
 |
| Note, we put in an in-ground power socket near the center of the floor so we wouldn't be tripping over cords for laptops or projectors while gaming. |
 |
| The two black pipes on the right edge are for a possible future sink. |
 |
Scoring the concrete pad on its axis to reduce chances of later cracking.
|
Once the pad had set-up for 48 hours, we were ready to erect the prefabricated panels and roof joists for the base structure. This was a 3.5 man job (I was the .5).
 |
It's just like LEGO! The prefabricated parts arrive onsite.
|
 |
| Parts just trimmed off the sprue... |
Finally the roof joists go up and the the electricians begin their work inside.
 |
This space will (hopefully) house sliding patio doors leading out to the courtyard.
|
 |
| Access door to the studio. |
Not shown here is the metal roof we had installed a few days after the main build. Now we're just waiting for the sliding patio glass doors and the main garage door and the structure will be sealed up. With COVID, the supply chain has many delays so we have to be patient. I hope to have an update showing their installation in the next few weeks. After that I'll schedule the building inspection and then start planning for the insulation and the interior. Wish me luck.
Have a great week everyone!
Curt, out.


